
8 Easy Tweaks to Improve Your Blog Now
Blogging Tips for New Bloggers
Growing a blog can feel like you’re being pulled in many directions not knowing where to go.
In the same way, you read up on the different blogging strategies and hacks to grow your creative biz and wonder: will it make a difference?
If you’re like me, you’ve spent countless hours reading blogging guides, enrolled for five-day social media challenges, downloaded essential blogging resources and follow successful biz owners in the hopes of learning something from them too.
While that is all well and good, let me ask you this:
Do you take action?
Do you apply their tips and strategies?
Or do you file it away in a mental folder about the things you need to do when you have the time to actually get around to doing it?
I have been there too.
And with all the information I read about and consume, I’m left thinking, “Okay, so what should I do first?”
And then you try to apply x, y, z strategies all at once and then you wonder why you’re still struggling to grow.
My first tip is to choose one thing you want to apply into your creative biz.
Focus on that and then move on to the next.
When you’re new to blogging it can feel like you’re way behind on the things you need to get done.
It can feel like a never ending list:
- Make blog post SEO-friendly
- Plan out content for the week
- Brainstorm blog post outlines
- Take photos for the blog
- Schedule a photo shoot & book a photographer or prepare the shoot equipment yourself
- Update all social media channels consistently
- Check site speed
- Check page views
- Write 3 blog posts
- Fix blog post layout
- Create Pinterest pins for new and old blog posts
- Schedule out pins on Pinterest
- Proofread blog posts
- Engage with the blogging community and connect with fellow bloggers
- Comment on creative posts on Instagram and Twitter
- Comment on other blogs
- Create an opt-in freebie
- Write emails for weekly newsletter and schedule it
…the list can go on and on.
It’s a lot, isn’t it?
Starting a blog is exciting because of the possibilities, but the true work lies in sustaining the momentum to grow.
But what if you want simple and easy tweaks that would up your blogging game?
Look no further ‘cause I got you covered.
Here are easy and simple tweaks that you can do in less than an hour to improve your blog & creative biz.
Before I proceed, I’d like to disclose that some of the tips I share in this post are specifically for WordPress users.
Now let’s get crackin!
Update Your Name & Photo Across All Platforms
Consistency is more than posting on social media and updating your blog posts on the same time and day.
It’s also about how your brand is seen online.
If a stranger finds your profile on Instagram, loves your content so much that he/she wants to follow you across all platforms, you have to make it easy for someone to find you.
More often than not, people will not go out of their way to find you on every single platform.
You make it easy for them to do that by:
Having the same username across all platforms
This one is tricky because your username in one social media channel may not be available in another; however, you can edit how you want your profile name to appear.
For example, my username for Instagram, Twitter, Facebook and Pinterest is @izzmatias though my YouTube is @izzymatias
I would have preferred that I could use the username @izzymatias across all platforms, but it is what it is.
Instead what I did is to update my name across the platforms and optimise it by adding a keyword in my name.
I learnt how adding a keyword to your profile name adds better chances at people finding you on Pinterest, so I decided to apply that same technique in my other social media accounts as well.
If you come across my accounts, you’ll see that this is my profile name:
Izzy | Blogging Tips + Creative Biz
Do note that each platform has character count limits, so tweak it and make it the best possible without compromising much.
Using the same profile photo
By using the same profile photo across all your channels, you make it easier for people to recognise you and go “okay this is the right profile” especially if you have different usernames in different platforms
Interlinking your social media accounts
There are social media platforms that allow you to link to your other accounts.
Take advantage of this opportunity.
If a person finds you on Youtube and wants to connect with you on Instagram, it’ll be way more convenient if all that person had to do was click the link on your header photo instead of opening Instagram and typing your YouTube username in the hopes that they’ll find the same person on Instagram.
Why else should you interlink your profiles?
It’s because people like to consume content in different ways.
Some people may prefer seeing creative shots on Instagram over watching a video on Youtube.
Add a Gravatar Photo
This second tip is related to the first just because we’re already talking about the subject of being consistent across all platforms.
WordPress blogs use Gravatar for their profile. The name and photo you see when you leave a comment on another WordPress blog reflects what is in your Gravatar profile.
Why am I telling you to also update this?
It is so that you can make the most out of your effort when connecting with fellow bloggers and integrating into the blogging community.
Let’s say you take the effort to comment on at least five blogs a day, but when you post a comment, you see that built-in gray avatar.
You won’t stand out and you definitely will not be building your brand presence online.
A person who sees that comment will not know that you are the same blogger who is also engaging with him or her on Instagram.
Leave a mark and get people’s attention by updating your:
- Gravatar profile photo with the same photo you use across all platforms
- Update your Gravatar name and include your chosen keywords – doing this will spike interest and might just get another person to check out your website
Check for broken links and fix them
Broken links hurt your SEO and your website rank on Google.
It will also leave a bad user experience for your readers or potential readers.
Imagine that someone comes across a Pin you created and wants to read a blog post that tells them why they aren’t getting many page views only to find out that that page does not exist.
It’s like giving them hope and then taking it away in a second.
For one, you just lost a potential reader and a potential subscriber.
It is unlikely that they will go looking for that post in your blog.
They’ll just leave the page and maybe not even give your blog the time of day.
Broken links can be in your actual blog post url or something you linked within your post.
It could also be from a link attached to one of your comments.
Here’s the website I use to check for any broken links:
https://www.brokenlinkcheck.com/
If you have no broken links, congratulations!
However, if you do find a couple of links listed, here is what you can do:
Check where that bad link is from.
Is it in your blog post or someone’s comment?
Brokenlinkcheck tells you where to locate this broken link via the “url” and “src” links in the table.
If it’s in your blog post, check if the link works and update or remove accordingly.
Maybe you accidentally missed a letter or symbol.
If it’s from a comment, I’ll check to see if there’s an error in the link and correct it.
For example, one broken link I got was because the blogger forgot to include a second slash before her blog link. Once I included the second “/” in the link text, it was fixed and her comment redirected to her blog.
Edit your SEO
You know how bloggers keep telling you to optimise your blog post for SEO?
Have you done the same for your blog pages?
If you have a section on your blog for travel posts, is that page easily searchable because you’ve optimised it for a certain keyword?
For example, if you run a blog for budget travel and you have a section on accommodations, you would want that page to be searchable for people looking for budget or cheap hotels or accommodations.
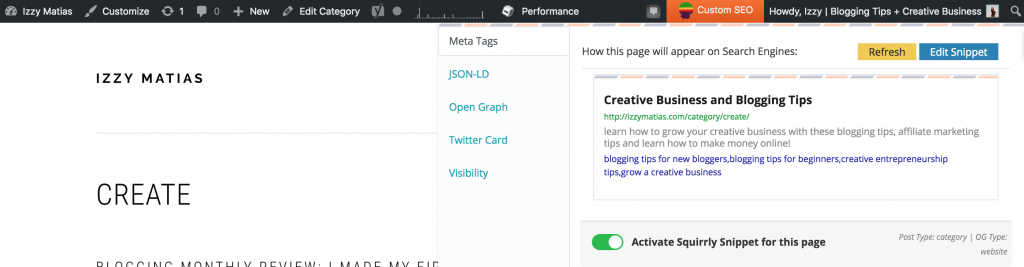
If you’ve installed an SEO plug-in like Squirrly, when you view one of your pages you’ll see an area highlighted in orange in your header tab that says “Custom SEO.”
When you click on it, you’ll be able to see how that page is seen in search engines.
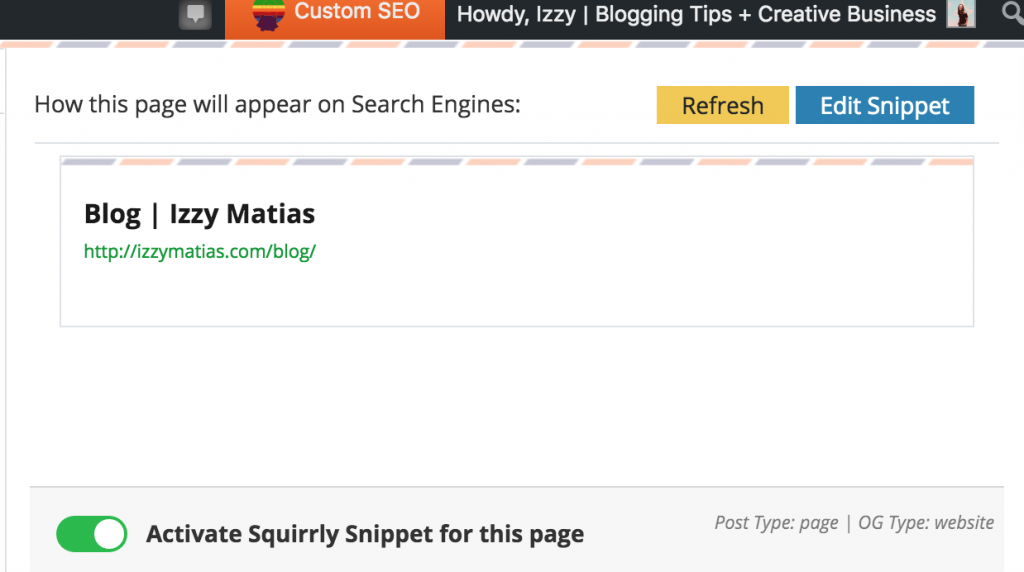
You can then proceed to edit it when you click “Edit Snippet”
Here’s what mine looks like for one of my pages.
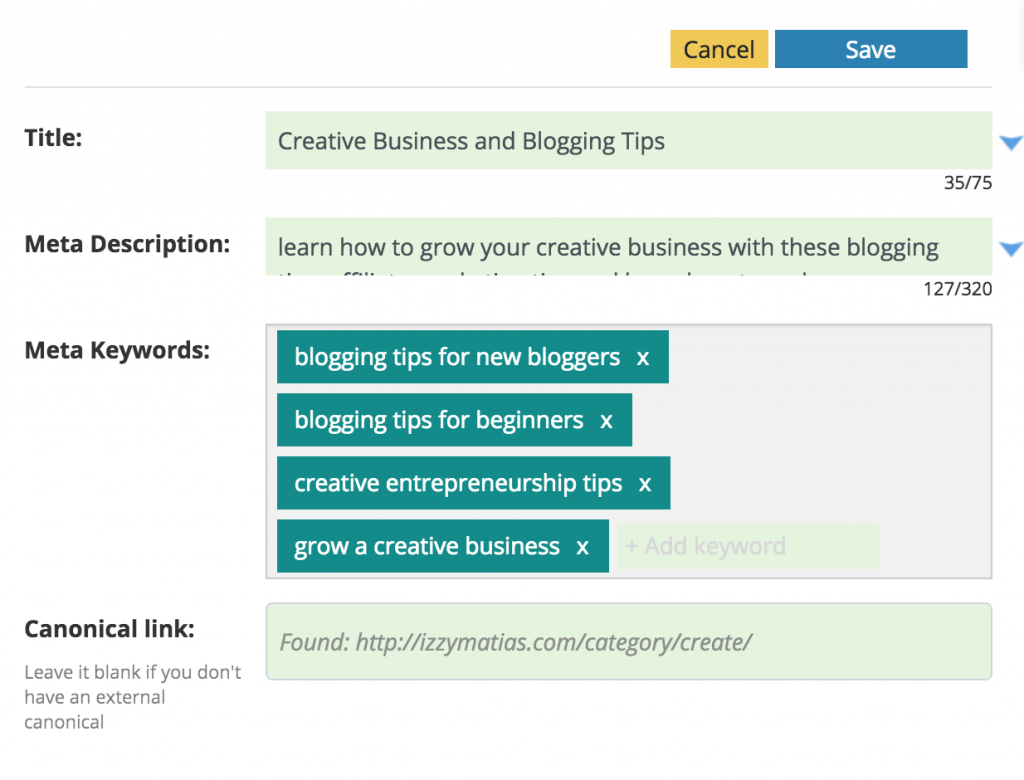
When you’re done updating, don’t forget to click “Save”.
Since we’re on the topic of SEO, I want to share with you the two WordPress plug-ins I use to help my posts in terms of optimisation:
- Yoast SEO – this one is great because the same meta description in this plug-in is used for your Pinterest pins (that is after you’ve enabled rich pins!)
- Squirrly – I like this one because it has a keyword research tool that helps me decide on what keyword I want my blog post to rank for
- Rank Math – this has been my favorite SEO plug-in and even has a headline score analyzer
Update Old Blog Posts
This tip will take more time than the rest because it requires you to edit and add more information to an existing post.
Go back and read through your published posts and see if there are posts that you can continue to add value to.
This can be in the form of creating more Pinterest graphics or writing more paragraphs.
Double check your post and see if you can add more internal links with your newer posts and respond to any unanswered comments you may have.
When you update it be sure to change the publish date to today so that the post is will be treated like a new post.
Create a content upgrade
“A what?!” you may be thinking.
A content upgrade is a free downloadable for your readers.
It’s one way of building your email list, standing out from other blogs and adding value.
Going back to the budget travel blog I mentioned earlier, a content upgrade could be a simple list of all recommended places compiled into a PDF file.
When you review your old blog posts, check if there are posts where you can add content upgrades to.
It’ll take a bit more time because you have you create the actual freebie.
You can create the list on Canva–they have pre-made templates from you to choose from.
And then you have to set up the series of emails to send the actual freebie and any other messages you would like to send through your email provider.
I recommend checking out Flodesk for its beautiful and easy to use platform or Convertkit for its in-depth funnel building and analytics.
Here’s an example:
- Reader gives his/her email in order to download the content upgrade.
- This triggers the sequence to start.
- The reader will receive an email with the downloadable freebie.
- If you’ve set up an email sequence for this download, your reader will then receive a series of emails scheduled (this can be a day after they signed up for the freebie and will continue until the last email in your sequence has been sent)
I would highly recommend that you set up an email sequence so that you can build a connection with your new subscriber.
If you would like to learn more about email marketing and setting up an email sequence for new subscribers, Meera Kothand covers this topic in-depth.
Test your site speed
It is crucial nowadays to have a fast loading site.
Why?
Readers will leave your page if it’s slow.
And if you’re building your blog, you don’t want people to exit without giving your content a chance first, would you?
You can check your site speed using Google’s PageSpeed Insights free tool.
It will tell you which areas take long to load.
Honestly, the first time I checked it, I felt overwhelmed with how to make my website load faster since a lot touched on technical terms.
I had tried to Google the solutions, but I was afraid of DIY-ing the fix because it might cause errors in my site, which would be a more serious thing.
Learning how fast my website loaded was something good to know, so at least I could take conscious steps in making it load faster.
For one, I downloaded the Smush plug-in, which compresses the image sizes.
It’s nice to have pretty pictures in a blog post, but if the files are too big they could be the cause of your slow site speed.
I also deleted any photos or plug-ins that I don’t use.
Konmari your blog!
Make a Blog Template
Instead of having to repeat the same manual steps every time you create a post, set aside the time to make a template so that when it’s time, all you have to do is tweak the template.
This will save you tons of time.
For example, if you have certain brand colors, make a brand palette guide stating which specific colors are for links, headers, and so on.
Create templates on Canva for your Pinterest pins, so when it’s time for a new pin, all you have to do is change the text and image.
You can even set aside one afternoon or morning to search for beautiful, stock free photos for your pins.
I would also recommend that you use an editorial calendar to keep track of your posts and help you organize your content.
An editorial calendar or content calendar is a tool I love to use.
It helps me stay on top of my posts and fights off that “I don’t know what to write about so I won’t post anything” challenge.
When I have it jotted down in my content calendar template, chances are I get things done.
What blogging hacks or simple tweaks would you recommend that helped you improve your blog?
PIN THIS!


The seo plug-ins was a great info. I’ll check on rank math haven’t heard of that. I find email list building the most difficult. Would look.more into using the providers on how to do that. The info in convertkit etc was great. Thanks, I needed that! Xx
Isa A. Blogger
This is a great post. Like you said, it’s a lot to digest but, the best way is to tackle each step with commitment, one by one!
Thank you, Rachel! What blogging goals are you focusing this month? 🙂
Thanks for sharing! Really helpful! It’s a good refresher for me too.
Thank you too for your comment, Carolyn! 🙂
This is a terrific resource for any new blogger! Well done article!
Thank you! 🙂
These are great tips that I will be taking on board!
Thank you for sharing.
Alyssa
THESACREDSPACEAP.COM
Thank you too for your comment, Alyssa 🙂
This was really helpful. I have been struggling in terms of what to focus on, so thanks for sharing!
Hi Tamra! Thank you so much. I really hope it helps 🙂