
My Blogging Process: How I Write and Organize my Content
Content organization is something I’ve been asked about by fellow bloggers and content creators.
It’s a process that I try to streamline so it’s more efficient and easier to create content.
In this post, I will show you my process of writing a blog post.
As I am typing this, I realise that it’s sort of like the movie Inception.
I’m writing a blog post, which is about my process of writing a blog post.
So here is how you can organise your thoughts and turn them into striking content.
This is my process from ideation to completion from thoughts to a finished article.
And what I make sure to include so that you get the most out of your blog post and are able to promote it well.
MY BLOG CONTENT ORGANIZATION PROCESS
Create a master file for all blog post topics
I start with my content calendar (also known as an editorial calendar).
I have a spreadsheet where I list down the topics I want to write about and the publication date.
This helps me stay on top of my publishing schedule especially since I have deadlines to work with.
What if you don’t have a content calendar yet?
You can check out this editable, digital one here.
Or if you prefer a physical calendar, I would highly recommend The Content Planner.
So in my digital content calendar, I have a master sheet of all post ideas.
Whenever I feel stuck, I whip out that list and choose which idea sparks excitement and write about that.
For example, for this blog, my three core categories are content creation, k-content, and travel.
Though this blog is about starting and growing your creative business–your blog–so you have more freedom to travel whenever, I mainly publish posts about how to grow your blogging creative biz, so I have a lot of posts about that topic.
Ask yourself: what are your main categories?
If you don’t have them yet, now’s a good time to brainstorm what topics you want to be the go-to person for.
No matter what topics you choose, you have to make sure that you focus on content that resonates with your community.
Schedule blog topics in a content calendar
Once you have your core categories, have a file where you list down every post idea you have.
Every time you think of what content you want to publish, write it down.
No idea is too small or too big.
Just write everything down and you can refine your idea from there.
What’s important is that you remember your idea.
If you don’t have a content calendar, what you can do is to have a spreadsheet where you list down your publication dates with the corresponding blog post idea/ topic.
Here’s an example:
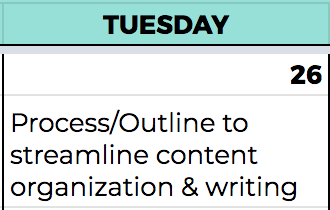
It doesn’t even have to be a sentence–as long as you know what you want to talk about, that’s okay.
You can be as detailed as you want to.
I like to plan ahead. I have blog post ideas lined up in my content calendar so all I have to do is check what the post is next and write that.
You don’t always have to write your blog posts in order of its publication date. Sometimes I feel more inspired to write one post over the other and I choose to prioritise writing that one.
And if all else fails, I move around my publication dates.
For example if my content organization blog post was scheduled two weeks ahead, but I finished writing it over the post that’s supposed to publish next week, I swap the publication dates. I publish the content organization blog post instead.
That way I don’t put too much pressure on myself either.
Choose which blog post to write about
As mentioned, you can choose to write your post according to the one with the nearest deadline or choose what you’re inspired to write about most first.
I usually switch things up. When I’m on a roll, I write posts chronologically according to their publication dates.
But when I’m feeling a bit meh, I tend to go with the topic that makes me excited to write.
There’s no one right process here. It’s about finding what works for you, and that’s what I hope to do in this post.
To give you a guide but to also let you know that the fun is in finding the process that works easiest for you and helps you get and stay in the flow.
Research what keyword to use based on the chosen topic
For my first draft the topic I chose from my content calendar becomes my working title.
I then pick out what keyword I want to focus on for the post and how I can incorporate it into the blog post title, meta description and throughout the post.
Aside from that, I use the exact keyword as my blog post link.
It’s important to do keyword research to check how easy or hard it is to rank for a certain topic.
For example, the keyword “start a blog” is very competitive.
There are thousands of blog posts that cover that topic, so it will be harder for you to rank, especially if you’re a new blogger.
By doing keyword research, you can pick a long-tail keyword (keywords with more than one or two words) and see how easy it is to rank for.
I use the WordPress plug-in Rank Math, keyword research tool Keysearch, as well as Google Trends to help me with keyword research.
So while I choose my blog post topic based on what I want to write and what makes me excited to write about, I also think about optimising it for search engines so that I can attract blog traffic organically aside from promoting it on all my social media channels.
Unlock Steps 5-11 of My Blog Content Organization Process
There is more that goes into my content organization such as my writing process and how I make my blog post SEO-friendly and the other steps you shouldn’t miss when publishing a blog post. You can find all of this information and the full article of my blog content organization inside The Content Chest community.
PIN THIS!
What’s your process like? Let me know in the comments below!
RELATED POSTS


I loved reading about your step-by-step blog post process, I need to start planning my posts too! x
Lucy | http://www.lucymary.co.uk
We used almost the same tips to
Stay consistent in blogging. Having a blog post master file and content calendar really helps. I even use a content journal as well.
it is always great to see how others organize their content when blogging. The tips can help anyone in the process. THANKS!
Thank you! I do hope this was helpful 🙂
Wow I’ve been blogging 4 yrs and so struggle with this and staying organized once never seen it explained this well !Going to subscribe !
Thanks for sharing
Val
Hi Val! Yes, I struggled a lot with staying consistent and having a content calendar really helps a lot. Thank you so much for subscribing. 🙂
This was more useful that I was expecting. Thank you for sharing all your tips on SEO, Canva and do fourth. I will be referring back to your blog in future for content creation tips.
Thank you for your lovely comment, Emma! 🙂 You’re welcome! Let me know if you have any questions; I’d be happy to help. 🙂
This was very useful! I’ll be bookmarking this for later. So much more goes into blogging than I initially thought! Thank you for your insight.
Thank you too, Rob! 🙂 What’s your blogging process like?
I haven’t got a solid process yet! I just write and hope for the best ?
Thanks for sharing this. I am a blogger as well and I have to have a weekly checklist to stay organized
Thank you too, Nene! I have a checklist as well 🙂
Thanks for sharing your process! It’s always interesting to see what other people do!
Thanks, Carolyn! What’s your process like? 🙂
Thanks for sharing. I am a blogger as well and am always curious where and how other writers come up with inspiration.
Thank you too for taking the time to read this post. 🙂
My process is actually very similar to yours! I’m the type of person that has to have everything written down & planned ahead of time & I also have a master list of any blog post topic that comes to mind…it’s definitely a lot of help when it comes time to brainstorm ideas!
-Madi xo | http://www.everydaywithmadirae.com
I love ticking things off my to do list and it feels so good to follow the plan 🙂 is your master list online or do you write it down?